
The struggle of finding well fitting clothes is something anyone can relate to. People come in all shapes and sizes which makes finding that perfect fit a contemporary Holy Grail. As a young professional, I'm constantly looking for wardrobe staples to wear at the office, but finding a blouse that's tasteful, versatile, AND actually fits feels impossible! I'm taller than average so most tops either are long enough in the torso OR fit in the bust. Dont even get me started on shopping for pants!
I fell in love with this top on clearance online, read the reviews extensively, read the measurements, and eventually decided on a size 6. Despite the leg work, when it came in the mail it was still about a half size too big. With this quick and easy tutorial, you'll learn how to alter that top you love, but isn't quite your size. Start to finish this project only took me 20 minutes! 
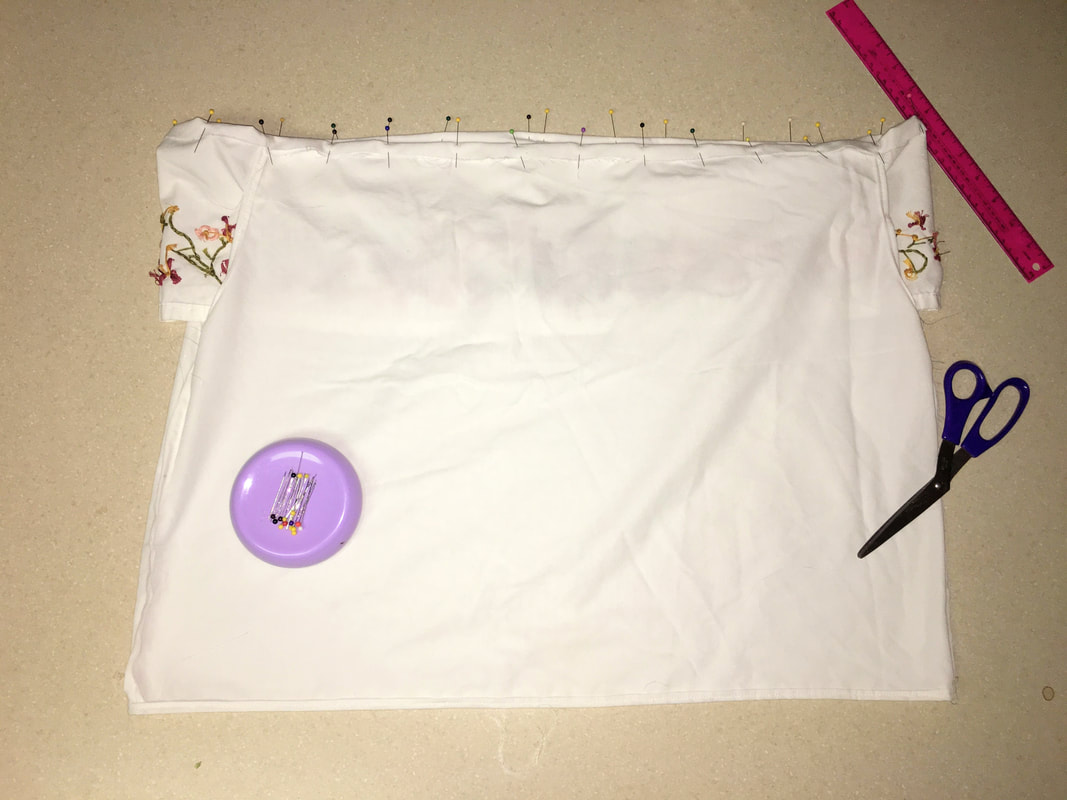
Step 1: Depending on how much excess fabric you have or how you want the garment to fit, think about what kind of alterations you want to make. If your top is too big in the bust, try adding darts with a great tutorial here. If the entire chest is too big, take in the side seams like I'm doing here.
Step 2: Put on your top inside out and measure out how much you want to take in. I took in one inch on each side. 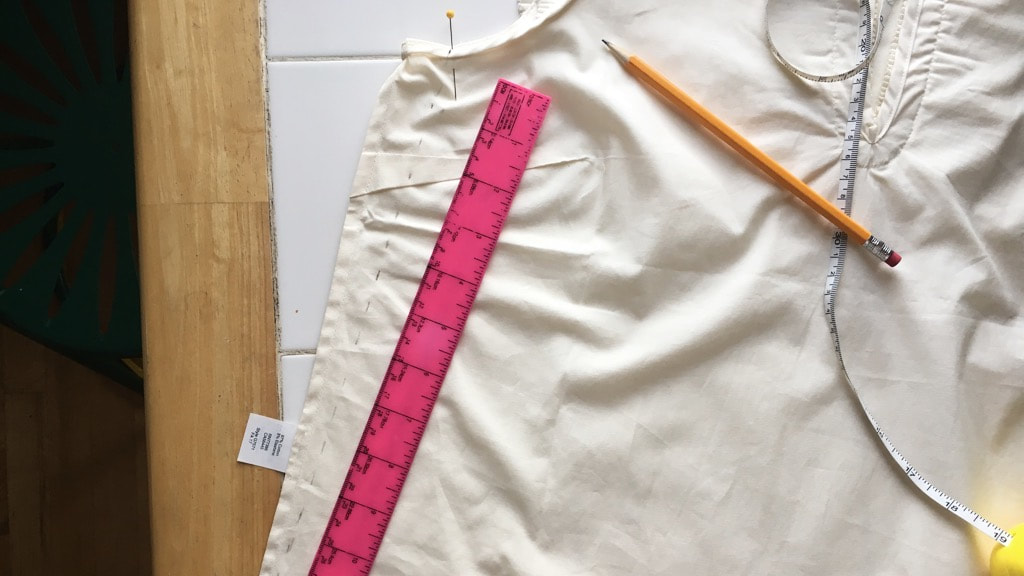
Step 3: Lay your top inside out on a flat surface and with a ruler, trace out how much you want to take in. I liked the way the top fit at the hips so I traced my seam so that it tapers out towards the bottom. If you want a more fitted look, keep your line parallel to the original seam.
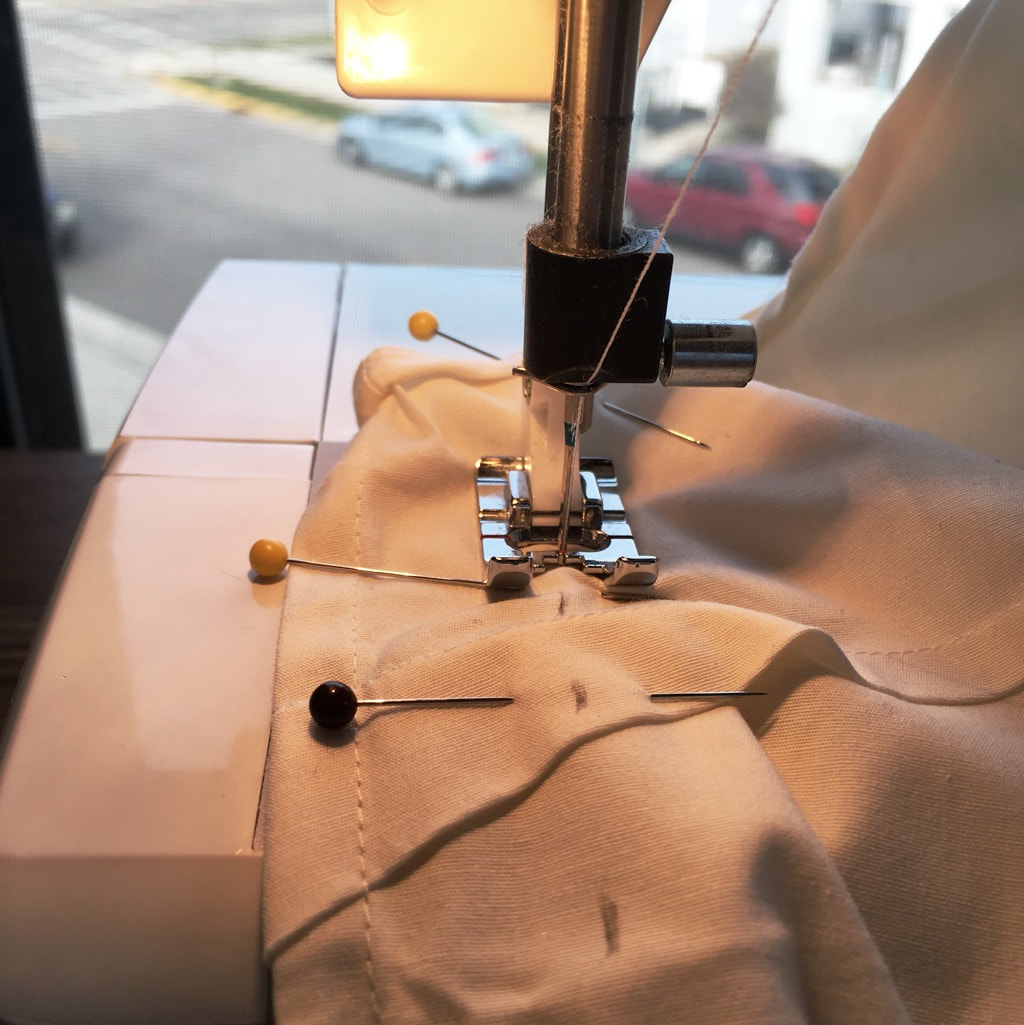
Step 4: Sew straight down your line. Remember to backstitch at the arm wholes and bottom seam and make sure the size of your new stitch a similar to the original ones.
Step 5 (optional): If you're taking in your top by more than 1.5" you might want to trip the excess fabric. To keep the raw edges from fraying, add a zig zag stitch to keep the fabric from fraying during wash and wear. Then trim the excess, et voila! You're done! 
0 Comments
I think what I enjoy the most about getting back into sewing is thinking about how clothes work. Until you start cutting the fabric you don't think about how your armpit holes fit, you just expect it to work. My new mantra is when in doubt cut extra. You can usually trim it later. One of the great things about making your own clothes is that you pick how it's going to fit. If you want more structured stiff ruffles, cut them shorter and pull the basting stitch a bit more. If you want an empire waist, cut your bottom ruffle a little longer. Want a more fitted look, add some breast darts or cut your fabric a little smaller. The possibilities are endless! Trace out a blouse or dress that you like the fit of on your fabric. Remember to cut an extra .5-1" around your outline for seam allowances. Once you've cut out the pieces sew together the shoulder tops (right sides facing of course) and the tops of the collar liners. Next sew the collar liner onto the neck line. Turning the sleeve and waist ruffles from boring rectangles to trendy ruffles is actually pretty simple. Set the your sewing machine to the largest setting and run a basting stitch along the top. Pull one of the threads and let the ruffling begin. Just make sure you don't brake the thread or pull it all the way out.  Next, sew the arm ruffles onto the arm holes. Then close the arm ruffle and go down the side seam. For a really handy visual of how to put this top together, check out the Merrick's Art tutorial. There are other ways to assemble a blouse, but this version was way easier than what I initially envisioned in my head and is way easier. Once the main part of the shirt is assembled, it's time to add the big ruffle on the bottom, add a button hole to the notch, et voila! I decked out my ruffle with some custom embroidery or you can leave it plain. 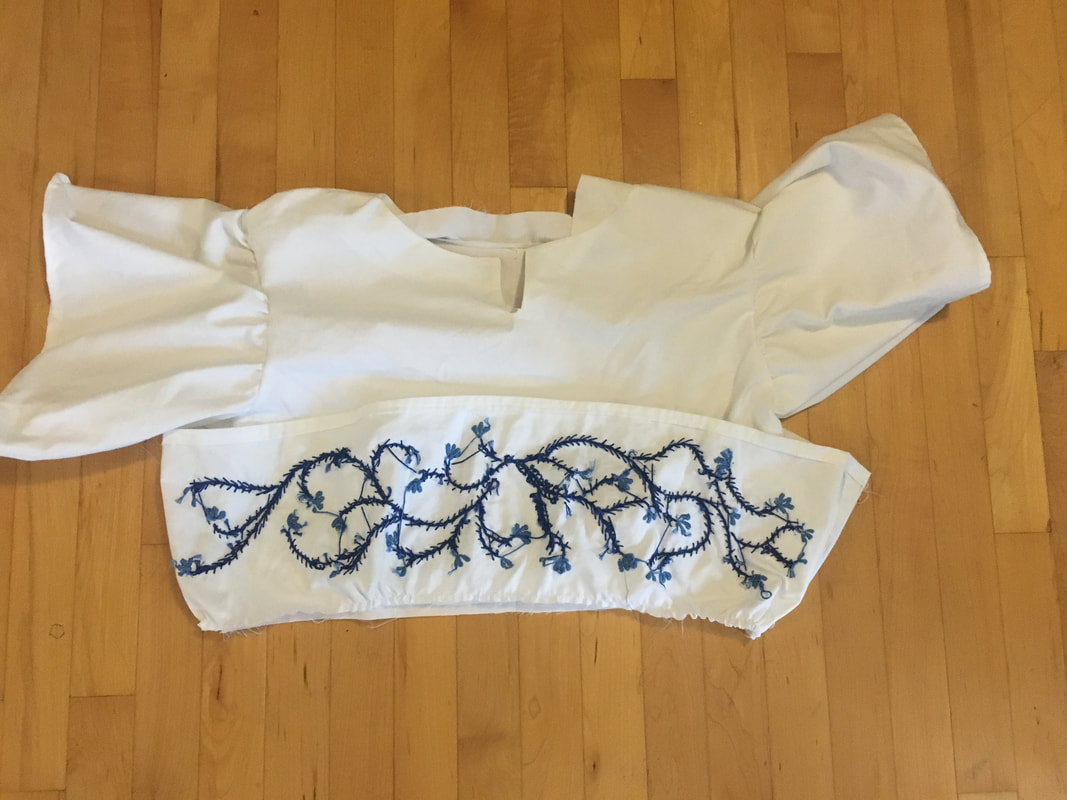  It's late summer and that means CORN IS EVERYWHERE! Technically speaking it's also hatch cilli season, but seeing as I'm not in Texas anymore, that means I have to think of other ways to season this delicious summer soup. And what I have in my fridge this week is basil and bacon ...so... Bacon and Basil Corn Chowder. Here's a couple things I've learned from coming up with a recipe for corn chowder. 1. You need more than corn and potatoes in your soup. It's very very boring without them 2. The beautiful golden yellow color of the soup does not come from the yellow corn you use. It comes from the tomatoes and the chili powder. Who'd have thought?! 3. Substituting the half and half for this recipe gives you some very watery soup. You can mix the two milks together to lighten things up, but you can't just do milk by itself. Ingredients 4-5 ears of corn, boiled 5-7 red potatoes (5 if they're big, 7 if they're small) 2 handfuls of grape tomatoes 2-3 cloves garlic 2 cups half and half 1t chili powder salt and pepper to taste 1 handful fresh basil, chopped
1. Over a cutting board or shallow bowl, cut the kernels from the cobs. Chop potatoes into small bite size pieces and halve the tomatoes
2. Cut the bacon into 1" pieces and cook in a large soup pot on medium heat till crispy, about 10 minutes. Remove bacon from grease and set aside. 3. In the bacon grease, cook the potatoes, garlic, salt, and pepper for about 5-10 minutes. Add in the tomatoes, and garlic in grease. Cook 10-15 minutes. Potatoes shouldn't be totally soft yet. Continue to salt and pepper to taste as you continue to add ingredients. It's an easy way to keep your food from being bland. 4. Add the half and half and chili powder. Reduce heat and simmer 10-15 minutes. In the last few minutes stir in the fresh basil 5. Ladel into bowl and top off with bacon bits. Serve and enjoy!
I got the instructions for this top from one of my favorite blogs, The Sorry Girls. They do a ton of awesome DIY posts. I made two changes to their instructions: the length (20" instead of 18" for the torso) and the fabric. In their version, they suggested using an old button down blouse or some flowy fabric. As I was attempting to clean out my apartment, I came across one of my old dorm sheets (thanks Target) and decided to use that instead. 1) it's ~*eco-friendly*~ 2) it's softer than a lot of the fabrics you find at craft stores, and 3) it's fo' free! Bottom line, I think I spent $5 on embroidery thread and $2 on the elastic, which makes it perfect for my technically-not-in-college-anymore budget.
I was shocked by how little time it actually took me turn this from 4 rectangles into a something wearable. All in all I think I spent about 2 hours sewing this. The longest part was probably ironing the hem. Shout out to my roommate, Paulina for letting me borrow her straightener because I don't own an iron. I would recommend doing a rolled hem for the bottom so your top doesn't fray after you wear/wash it.

I love pies. I firmly believe that there is no situation that can't be improved by pie. Because of this I've always been particular about pie crust. A good pie crust can make a can of pre-made pie filling taste like you slaved for hours and can make homemade filling culinary perfection. I hate to break it to you, but those store bought pie crusts just don't measure up.
Homemade Crusts 101
1. Temperature. Temperature. Temperature. The key difference between homemade and store-bought crust is that crusts you make yourself take a little more effort to prevent holes. This is because they're made with butter and shortening. Even though you start with cold butter, you've got to chill your crust when you're not rolling it out or cutting out your designs because the butter will soften.
2. Patience is important. Because the crust is temperature-sensitive you have to chill it semi-frequently. It may take a little more time, but trust me it's worth the wait. 3. The key to a gorgeous, shiny pie crust is an egg wash. Just beat a single egg and use a pastry brush (or just your fingers if you don't have tons of tools like me) to paint on a thin egg layer. 4. My secret for pain free crust is using a food processor. The whole process takes about 10 minutes. But if you don't have a food processor, you can just as easily use a pastry cutter, potato masher, or some good ole' fashioned forks Make the Crust
Crust Ingredients:
2.5 c all purpose flour, plus extra for kneading and rolling 1/4 tsp kosher salt 3 Tbs sugar, plus extra for garnish 1/4 c shortening 12 Tbs butter, cold and cubed 1/4-1/2 c ice water 1 egg (for the egg wash) Filling Ingredients: 1 pint raspberries 1 pint blueberries 1 c sugar 2 tsp lemon juice 1 tsp cinnamon pinch of salt 1/2 c corn starch 1. Put the flour, salt, and sugar in your food processor and pulse a to thoroughly mix the dry ingredients. 2. Add the cubed butter and shortening to the mix and pulse till incorporated. It should have the consistency of moist soil (middle image). 3. Slowly add the ice-water through the top of the food processor till the dough just comes together (third image). 4. Transfer the crust to a cutting board and knead together. Wrap in plastic wrap and chill in the fridge for 30 minutes. Don't cheat and put it in the freezer for less time. It doesn't agree with the butter. Trace the Direwolf
5. Roll out 1/2 of the crust (if you don't have a rolling pin you can use a wine bottle like me!).
6. Then cut out your Direwolf (no teeth) outline with a small and sharp knife. Cut your little fur tufts, eye, nose, and snarls. 7. Sprinkle flour on a second cutting board and transfer your Direwolf. Put more flour on top of the wolf as well. 8. Chill Direwolf in the fridge for 20-30 minutes. Ball up the scrap dough and chill as well. Put it all together
9. Preheat the oven to 400 degrees
10. While your waiting for the dough to chill make the filling by adding the fruit, sugar, lemon juice, cinnamon, and salt to a medium pot over medium heat. Stir in corn starch a little at a time till it's the consistency of gravy. Remove from heat and rest. 11. Roll out the 2nd half of the dough into a circle for the base crust layer and loosely drape over the pie plate. 12. Pour in the filling. 13. Roll out the leftover Direwolf dough and cut out 8, 1" strips with a pizza cutter and make a lattice design. 14. Take the Direwolf out of Make an egg wash by beating an egg in a separate bowl. Brush the egg in a thin layer on the back of the wolf. This will help him stick to the rest of the crust. 15. Brush the egg wash onto the lattice. 16. Bake at 400 degrees for 10 minutes. Reduce heat to 375 degrees and bake for an additional 30 minutes. 17. Let pie cool, serve and enjoy. 
I first learned about sewing when I was in 3rd grade (ish... it was a long time ago) with my Girl Scout troupe when I was still living in California. We made little quilted pillows to give to kids in a children's hospital. Later, when my iron on badges would fall off my GS sash, I learned how to sew them back on by hand. Later on I my parent's gave me a sewing machine and I learned how to make simple clothes and eventually made a quilt. Forgotten skills like sewing give me a creative outlet, but they're also really stinking useful. Got a hole in your shirt? Fixed. Love those shorts in the store but they're too long? Fixed. Dress doesn't fit quite right? Fixed. These are all reasons why learning to sew is important. One of the best ways to learn the basics of needle crafts is with simple embroidery stitches AND you don't need a sewing machine to do it.
In the spirit of Cold Brew I decided to pick up my very old and rusty hobby and re-learn how to embroider. In the few weeks that I've been working on this project, it's quickly become one of my favorite hobbies. Losing track of time as I work out the design is exhilarating. I'll sit and work while I'm watching Netflix and all that pent up energy that makes you check facebook 15 times during one episode is gone (because my hands are busy) and I get to feel productive even if I'm just sitting around doing nothing on a Saturday.
Getting started is simple. I'll show you some basic stitches and I hope it inspires you to pick up a new skill. Here's a handy reference picture.
Supplies
Fabric - cotton is nice but anything without a lot of texture works (I cut up my old dorm sheets)
Embroidery floss - certain colors will speak to you when you're in the craft store; go with it Embroidery hoop - trust me this makes your life 10x easier. I got mine from Hobby Lobby for less than $2 Needle with a large eye (ex. tapestry needle) - this is different than the needle you would use to sew on a button Masking tape (optional) - this is helpful if you want to keep any raw edges from fraying Flowers
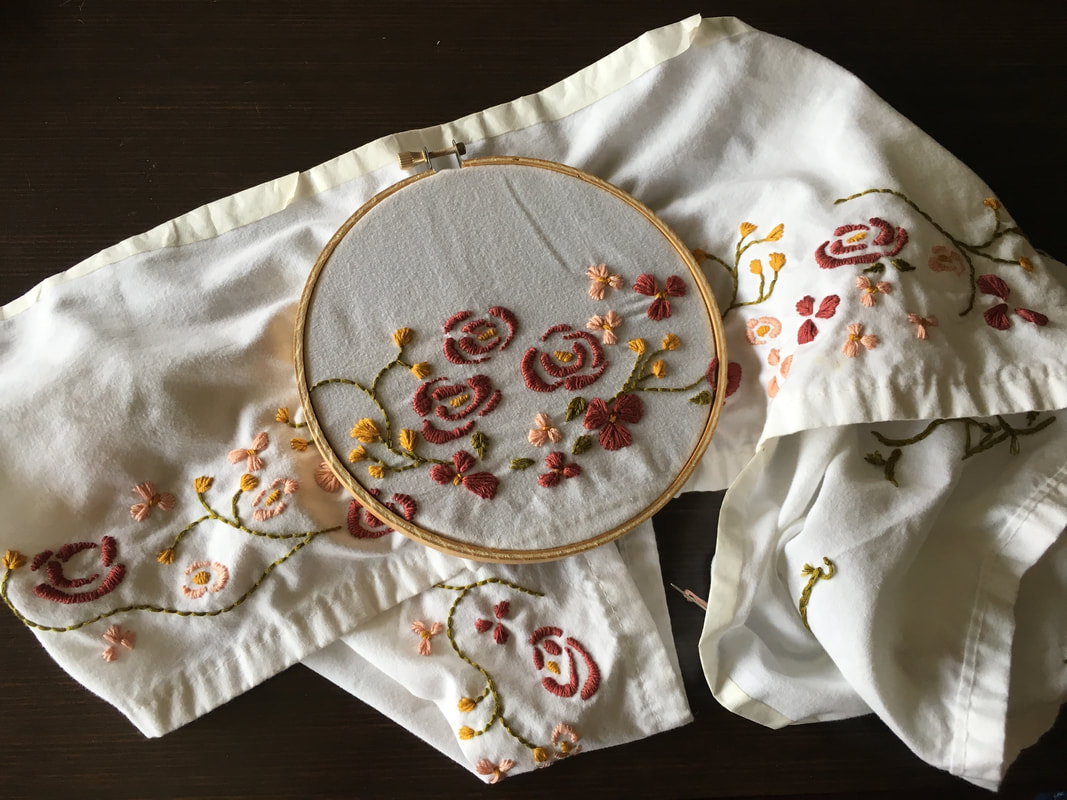
1. In the beginning it is SUPER helpful to draw out what you're stitching.
2. This flower is made with something called a satin stitch (yes I looked that up because I'm self-taught). To make this type of flower, start by poking the needle up through the INNER edge of the outline and send the needle back down the OUTER edge of the outline. 1st stitch: INNER to OUTER. All remaining stitches: OUTER to INNER. This is probably poor professional technique but this is CB@22 and I'm doing it my way, which is the best part about DIY. 3. Keep working your way around the outline. Leaves
1. Put two back stitches up the middle of the leaf
2. Fill in the leaf one half at a time. 3. Done with the leaf. 4. Fill in with yellow accents. 
I know what you're thinking. "Emma likes red meat. Why on earth would she try making turkey burgers?" Well guess what. This is CB@22 and I'm here to try new things and tell you about it. I never thought I would enjoy eating a turkey burger I always thought it would feel like eating a turkey sandwich. Believe me when I say it: these bad boys are so amazing that I've already made two batches. Give them a try and you won't believe your tastebuds. Did I mention this recipe is Whole 30 friendly?!
Ingredients 1lb ground turkey 1 sweet potato (shredded and uncooked) 2T coconut oil 2T coconut flour (or regular flour if Whole 30 ain't your thing) 1/2c chopped green onion 1T garlic powder 1T Lawry's season salt (only if you don't care about Whole 30) 1T salt 1T pepper Combine all ingredients in a large bowl and mix till evenly incorporated. Shape into patties about 1" tall and 3-4" wide. Cook on a grill if you've got one or sauté in pan with oil if you live in a tiny apartment like me. Serve with all the fixins your heart desires. Enjoy! 
Made together by your favorite Neale Sisters, I give you the recipe for our all time favorite Chocolate Cake. Nothing less than chocolate perfection will do for the two of us, so rest assured that this is the only chocolate cake recipe you'll ever need.
Ingredients Chocolate Cake 2c sugar 1-3/4c flour 3/4c cocoa powder 1-1/2t baking powder 1-1/2t baking soda 1t salt 2 eggs 1c whole milk 1/2c vegetable oil 2t vanilla extract 1c boiling water Chocolate Frosting 12 oz. cream cheese, room temperature 2 sticks (1 cup) unsalted butter, room temperature 2 cups powdered sugar Pinch of kosher salt 12 oz. bittersweet chocolate chips, melted and cooled Directions 1. Preheat oven to 350F and grease three 8" cake pans. I also used parchment paper to line the bottom of the pans because I'm paranoid. 2. Start boiling 1c water (plus extra for evaporation). 3. Stir together flour, cocoa, baking powder, soda, and salt in a large bowl with a whisk. Add eggs, milk, oil, and vanilla. Beat on low with a mixer for 2 minutes. Stir in the boiling water. The cake batter will be thin and runny. This is normal. 4. Bake for 30-35 minutes, rotating pans halfway. Once removed, let cool in the cake pans for 10 minutes, then transfer to wire racks. 5. In a large bowl use an electric mixer (high) to combine the cream cheese, butter, powdered sugar and salt till fluffy (at least 5 minutes). Melt the chocolate and slowly fold into the frosting. Once incorporated, turn up the mixer to high and beat till thoroughly fluffy. 6. Frost the cooled cake layers evenly and decorate with whipped cream, bluberries, and rainbow sprinkles. 
As I was walking out of the office on my last day of work today I was moved to tears. I didn’t cry leaving lab. I didn’t cry leaving chapter. I didn’t cry at graduation. As I was walking out the Office of Postdoctoral Studies and saying goodbye to my boss who had become my mentor, I remembered the person I was when I started working there. I started out so insecure and unsure of my plans. With time it became more than a job, it became the best part of my day and it helped me discover my passion for project management. It taught me how to see a project through from start to finish. It taught me how to network. It taught me the value of communication. Whether you’re a waitress or a CEO, they are lessons you need to know.
I resented changing my preconceived career plans because I felt that I hadn’t chosen this path; that I had lost control of my future.
This past year brought so much change into my life. One year ago I was 21, finishing my junior year of college, and had just been laid off from what I thought was my dream job. I thought it was my ticket into the biotech industry, my foot in the door to a successful career. Then one day before finals week I was told that my hours for the summer were going to be reduced by more than half and that my position would be eliminated come fall. My boss discouraged from continuing my position for the summer telling me I would be a “wasting my time”. My measly undergrad position was being removed because my department wanted to afford better equipment and more PhDs.
When I started working at my new job I resented it. I resented my old job for letting me go. I resented the constant stream of lab jobs I applied for that all told me, ‘no’. I resented myself for feeling so helpless. After giving up on finding a lab work I started looking for any office job that would take me. Soon enough the Office of Postdoctoral Studies hired me because I knew how to use Excel, Mailchimp, and Illustrator. I knew I was lucky for having found another job so quickly, but I resented changing my preconceived career plans because I felt that I hadn’t chosen this path; that I had lost control of my future. I didn’t know that this new job would introduce me to a career field that I never knew existed. Over the course of the year, I learned how to make connections that led to my first out of college job. I learned to speak up for myself and ask for what I want. I learned that my mind moves a mile a minute when I get excited about a new project and I learned how to communicate what was going on in my head with my peers. If I let go of the fear of trying, I can far surpass the limits I thought I had.
My time at the Office of Postdoctoral Studies has been such a formative and meaningful experience not just in my professional life. It has taught me that if I let go of the fear of trying, I can far surpass the limits thought I had. It led me to a career path that I never knew existed and that I never knew I would find a passion for. I was able to discover my love for problem solving, communication, and management. It showed me how amazing mentors not only give you the tools to succeed but also get out of the way to let you fly on your own. They teach you to hold yourself to a higher standard, but give you to tools to take on a project and run with it.
Take my advice and learn to love running with it. It's the best feeling in the world. 
If you're graduating this spring you've probably been asked at least one of the following:
1) What are your post-graduation plans? 2) What's the best advice you can give? Depending on who you ask, the former is a little more dreaded than the latter. Personally, I've was fortunate to secure a job so I'm significantly less anxious about life after graduation than some of my peers may be. That being said, diving head first into adulthood for the rest of your life can still feel overwhelming no matter what your plans are. The training wheels of college are coming off and bigger life changes are headed your way. You can spend your time worrying about the future or you can turn your worry and anxiety into something to look forward to. Diving head first into adulthood for the rest of your life can feel overwhelming no matter what your plans are.
Instead of worrying about paying off student debt, look forward to the day when you're debt- free. Instead of being sad about parting ways with great friends, be excited to plan reunions and keep in touch from afar. So much in life is beyond our control. Even though it's hard to tame that big "what if?" monster, our time is better spent celebrating today than dreading tomorrow. Make time to go out with your friends, take a nap, treat yo’ self, and eat the damn cheese curds.
|
AuthorEmma Neale: (young) adult, cat mom, and aspiring for adventure. Archives
February 2019
Categories
|


 RSS Feed
